Saturday, December 10, 2011

Mango Lassi


Is it really the 2nd week of December already?

It flew just like that, huh.

Also, I didn't notice that a month has passed since I started a little lifestyle change.

Let's just say I increased my fruit and vegetable intake to 60%, cut my caloric intake in half, and lost some weight.

Pretty amazing and awfully hard but it can be done.

And if there's someone who's gotta do it, that someone should be me.

One post ago, I mentioned that there will be a few changes in here.

First, I will be featuring a lot of vegetable and fruit dishes now.

There will still be the occasional meat and seafood posts, of course!

Second, I will include nutrition information in every featured recipe.

That way, we'll all know what's going on. Ha.

Third, I will be posting some health and fitness links that I know are worth reading about.

Believe me, the articles that will go in here are only "realistic" ways to be healthy. 

Nothing drastic. Nothing that may strain our relationship. 

So why is this meat-loving, deep-fried dreamer doing this now?

I'm doing this because I've had too much and it has taken its toll on my holistic health.

And I guess if I don't act soon, I'm afraid I'll be too sick to take care of my parents when they're aging.

Or maybe I won't be around anymore.

Damn.

Anyway!

Here's to my journey! And if you want to, come tag along. 

Let's drink to this!


Sweet Mango Lassi

You will need:

1 medium ripe mango, peeled, cored and scraped
1 small container (125g) plain yogurt 
1/4 cup evaporated milk, preferably frozen
1/4 cup cold water

How-to:

1. Mix all ingredients in a blender. If you can, freeze your evaporated milk beforehand so it will serve as the "ice" in the blended lassi.

2. Serve in glass and drink cold! :)

Yield: 1 serving
Calories: 293
Fat: 4g
Sugars: 41g (85% is from the fruit)
Calcium: 500mg (half of what you need in a day!)

Till the next eats! 


Monday, December 5, 2011

There are small victories.


Some people do what they do to be rewarded.

Some people do what they do despite reward.

Sometimes, I do something I love so much that doing it is a reward in itself.

This is why I have this blog. 

I may not be a prolific foodblogblogwriter.

I don't write every week even when I cook everyday.

I am super self-conscious with the content that goes into my blog posts. 

I'm a little OC about these kind of things because I tend to stray and I suck at organizing my thoughts.

Then I see my stats and find out a decent number of people have reached my blog.


Okay, not sure if all of you are people but I'm pretty sold the ones who've read this far are. :)

Then among a bulk of hotlinks in my chat box, there are a few real people saying they appreciate the stuff I wrote. 

That all of it made them hungry.

And then I have friends who once in a while mention my blog to me, sometimes to other people, sometimes in their own blogs.

I think that is just awesome.

And it's one of the reasons why I maintain diy-eats.

And I'm ecstatic to announce that I have been nominated for a Best Cebu Blogs award in the Food and Personal Category. 


Not only that, I've also become a finalist in both categories.

Last year, I won an award from them as one of the most popular blogs through shameless self-promotion, err I mean Facebook likes.

Haha!

At least, I know I have over a hundred people willing to back me up.

Just kidding.

So, the awarding for the 4th Annual Best Cebu Blogs Awards will be this FridayDecember 9, 5 p.m. at the SM City Cebu Conference Hall A.

I am going! For posterity! Haha.

So, yeah.

May the bestest blog win!

Also, congratulations to all the dedicated Cebuano bloggers who made the cut!

Keep doing what y'all do for love (and hopefully, nothing else).


Till the next eats,


Monday, November 14, 2011

Simple Surf and Turf


I knew, at some point, I will have to blog about steaks.

I can count how many times I've cooked steak. Thrice.

Two of those times I was in the company of a chef so I guess it didn't count.

So technically, I've only cooked steak once. I feel so special! Haha!

It's quite tricky.

For 1 and ½ inch steaks: 7-8 minutes medium, 4-6 minutes medium rare.

I prefer mine medium or medium rare, which has got to be the sweetest.

Not a lot of people are partial to rare.

Not many people like the sight of “blood” in their food despite their love for vampire shows/movies/books/dreams and Dexter.

But let me play mythbuster.


See the “blood” that oozes out when you slice a juicy slightly cooked steak? That is not blood, hon.

It’s actually water and Myoglobin: an iron- and oxygen-binding protein found in the muscle tissue of vertebrates and in almost all mammals.

Myoglobin forms pigments responsible for making meat red so think of it as food coloring, that’s all.

Nothing gross.

I’m no steak genius. I’m steak dummy.

I didn’t grow up in a beef-eating home mainly because my parents were hardcore believers that of all meats, beef takes the longest to metabolize.

Also, it’s a tad expensive compared to pork and chicken.

But I just had to cook it.

Because this is probably going to be the last meat recipe I'm going to post this year.

Why?

I'm going to tell you in another post.

For now, let's get to the heart of the matter!


Simple Surf and Turf
: a main course in American cuisine which combines seafood and meat 

For the TURF, you will need:

4 cuts 1 and 1/2 inch steaks (sirloin or fillet mignon steaks)
1 tablespoon olive oil
salt and pepper to taste

For the SURF, you will need:

1/2 kilo shrimp or prawns
1 tablespoon butter
1 tablespoon lime or kalamansi juice
1 clove garlic, minced

For the sauce, you will need:
1 tablespoon butter
1 medium onion, chopped finely
1/2 cup red wine
1 tablespoon sugar
salt and pepper to taste

How-to:

1. Prepare the steak. Take out all the visible fat around the steaks with a small knife. Season with salt and pepper.

2. Heat olive oil in a pan and sear the steaks 3 minutes on each side for medium rare and 4-5 minutes on each side for medium. Set aside.


3. The pan where you cooked the steak is where you will nake the sauce (in my case, I used a dutch oven). Add butter and finely chopped onions and saute for 3 minutes or until onion is translucent.

4. Add red wine and sugar and turn up the heat to high. Let boil and reduce to half while stirring constantly to avoid burning your sauce.


5. Turn off the heat when your sauce reaches a silky consistency. Season with salt and pepper to taste.

6. Prepare the shrimp/prawns. Add a tablespoon of lime or kalamansi juice to the shrimp/prawns.

7. In a pan, melt butter and saute minced garlic. Add the prawns (with its juice) and cook for about 3-4 minutes if you're using small shrimp or 6-8 minutes when using large prawns. Season with salt and pepper if you like.

8. Place the steak on a plate, pour sauce over it and top it with the prawns. Serve it with your favorite salad or rice or my recipe of Scratch Potatoes.


Holy guacamole, indeed!

As what I stated above, this is probably going to be my last meat recipe for this year.

Also, it may take a long time for me to post another meat recipe so savor it while it's cold outside. :)


Much love!


Till the next (holiday) eats,

Friday, October 21, 2011

Spinach and Mushroom Bruschetta with Roasted Garlic and a Little Life Update


At laaaast. (Etta James voice)

You have no idea!

But I will give you some.

I've been working on my nth chance in school.

And I did it! I actually FINISHED something!

And when I looked at my parents' faces, man!

There is no better feeling in the whole wide universe than seeing the people you love truly happy.


I want to say my work here is done, Ma and Pa.

But who am I kidding, right?

My work has just begun and I've never been more ecstatic to flip to a new chapter in my life.

New stories. New characters.

Ma was right when she told me I have to "move" to find where I ought to be.

Pa was right when he told me things will eventually fall into place.

They're both right when they gave me another chance to pick myself up from the rubble I was in and trusted me even when I didn't deserve it back then.

It may be cliche but parents do know best - and they do love best. Hands down.


What did I learn in school?

The most basic knowledge is deep inside of you - school is where you unearth it.

It's where you learn how to do things. But outside is where you can test if all you have learned will eventually work.

And there will be times that it won't.

And that's okay.

Speaking of the basics, I've been wanting to post about this ever since I've tasted it in my old workplace.

It's not much of a staple recipe that is locally known but man, for someone who loves garlic so much, I find it ridiculous that I've been missing this food all my life.

Roasting is one of the easiest and probably the most delicious way to prepare garlic.

So delicious I even eat it as a snack!

Also below, another way to enjoy it.

You're welcome!

Roasted Garlic

You will need:

4-6 whole heads of garlic
salt and pepper
olive oil
a baking sheet

How-to:

Pre-heat oven to 230 degrees C (450 degrees F)
You can also use toaster oven for this recipe.


1. Slice off the top of the garlic heads enough to show its flesh.

2. Arrange the garlic heads on the baking sheet face/flesh up.

3. Sprinkle salt and pepper evenly over the garlic heads.

4. Drizzle a generous amount of olive oil on the heads.

5. Place in center rack of the oven for about 15-20 minutes or until golden brown.

6. Let it cool before placing in an air-tight container and store it in the fridge for future use.


Perfect for sauteing meat and vegetables, for soups, for sandwiches and for bruschettas!


Spinach and Mushroom Bruschetta with Roasted Garlic

You will need:


a whole baguette, sliced 1 or half an inch thick
1/2 cup spinach, purged and chopped finely
1/4 cup cream cheese, spreadable or softened block
1/4 cup button mushrooms (Champignon), sliced
2 tbsp olive oil
1 head roasted garlic
a dash of salt
2 tbsp grated Parmesan cheese (optional)

How to make:

1. In a pan, saute one head of garlic in olive oil. The roasted garlic's flesh is soft and you can simply squeeze it out of its skin.

2. Add chopped purged spinach and button mushrooms and season with some salt. Cook in medium fire for about 5 minutes and set it in a bowl.

3. Add in cream cheese and parmesan (if you have) and mix the filling well.


4. In a non-stick pan, drizzle a little olive oil and heat the baguette slices on each side until crisp. You may also use a toaster for this.

5. Spread a generous amount of filling on top of the baguette slices and just pop it in your mouth.


Wonderful.

The extra filling can be saved in the fridge for later. It can be used for paninis and savory crepes too!

Other than being really easy to prepare, what I love most about this is how satiating it is.

Two bruschettas and I'm solved.


Till the next eats my loves!

Tuesday, October 4, 2011

Stuffed Chicken Breasts with Parmesan-Basil Filling


I bought another cookbook last weekend. 

I have about 4 now.

It may be just 2% of all the books I have which, for someone who cooks often, is quite a shame. 

But that is about to change real soon because I have plans to buy a cookbook in every trip to Booksale.

Something I do religiously.

In the past posts, I made up recipes. 

Now, I've decided to adapt and recreate recipes from really good cookbooks.

I just want to know if I can do it.

Inside: Frank Sinatra's favorite dishes

The home kitchen is turning into the diy-eats test kitchen. 

Test kitchen because it seems that things always don't go right the first time.

I've had my share of rock solid cupcakes, runny sauces, a few burnt meat here and there.

Also, garnishing is not my strongest suit.

The learning process never ends. 

The best part is when I open the oven to unravel something great.

Something picture perfect like in the books. Something that tastes absolutely good.

The bestest part is when my dishes get rave reviews from my family. 

Hard to achieve.

Challenge accepted.


The recipe below is from Cook's Illustrated Magazine, a publication I've come to love because of how good they break complex kitchen dillemas down into very simple instructions, even a newbie would find it easy.

I also love how they give a lot of time, careful planning, and two-page spreads to each recipe. A sign that they care about food and the people who tries to make 'em good.


Stuffed Chicken Breasts with Parmesan-Basil Filling
(Adapted from Cook's Illustrated June 2011)

Note: Buy chicken breasts with skin still attached and intact; otherwise the stuffing will leak out during cooking. 


What you need:

4 chicken breasts, skin-on, bone carefully taken out
salt and pepper
olive oil

For the cheese filling:
1/4 cup parmesan cheese, grated 
1/4 cup cream cheese, softened
1/4 cup fresh basil leaves, minced
2 tablespoons extra-virgin olive oil
1 clove garlic, minced finely like a paste
a dash of salt and pepper

How to:

Pre-heat oven to 230 degrees C (450 degrees F)

1. Pat chicken dry with paper towels and season with salt and pepper to taste. 

2. Using your fingers, gently loosen portion of the skin covering each breast, making a pocket big enough for filling.


3. In a bowl, mix all the ingredients for cheese filling and carefully fill each breast under the skin (about 1 1/2 teaspoons). 

4. Brush chicken with olive oil and place on foil-lined baking sheet. Bake chicken for 30-40 minutes. 

5. Serve with a side of salad or rice. 


For the record, this is the first time I've ever baked chicken. 

It turned out a little dry so add a little more olive oil. 

All in all, it was a totally delectable recipe.

I am a big fan of cheese (!!!) and sure enough the chicken skin together with the salty-tangy taste of cheese had a wild party in my mouth.

I made it this morning and it was meant to be for lunch but I think it's all gone before 10am AKA the fam bam loved it.

I live for small victories.


Till the next eats!


Friday, September 30, 2011

Fried Pork Nuggets and Tofu in Chunky Basil Tomato Sauce


Am I in a roll?

Just making up for lost time!

How are all of you doing?

The weekend is here! I'm just going to stay at home and think about what I should cook tomorrow.

Have I become boring? Been asking myself that a couple of years now.

I have to admit, I've mellowed down a lot.

I guess I ran out of energy and interest in partying. Maybe because I've been doing it hard for a decade.

It's funny because when I was a kid, I've always liked playing indoors. Always been interested in what my Ma or yaya did around the house and stuff.

Then puberty! I only stayed at home to sleep and eat.

Then today! At home on a Friday night, deciding whether I should read the latest book I've hoarded or spend  2 hours watching reality TV shows.

Pretty cool. Everything does come full circle.

Does it mean I'm going to be wild partier when I turn 40?

Simbako! or to those uninitiated: PERISH THE THOUGHT.

Some of my friends say I'd be a great housewife by now.

I say I should just focus on being a great houseperson and I'll be fine.

Who hurt you, Basil?

I'm super happy today because I found a pack of (not so) fresh basil in the fridge.

Turns out my Ma brought (and bought!) the list of stuff I need in the kitchen when she went grocery shopping alone. (I usually am with her every time she goes)

Well, my only concern is that this herb easily bruises which makes it hard to work for garnishing.

Other than that, I love it. I love its odor the most! So fresh and delicious.

I was about to just cook a recipe for a basic basil tomato sauce but I checked the time: 5pm.

Time to make dinner. So here it is!


Fried Pork Nuggets and Tofu in Chunky Basil Tomato Sauce

What you need to make the Fried Pork Nuggets and Tofu:

(very much like making meatballs or the local bola-bola)

500 grams ground pork
2 pieces fresh eggs
1/2 cup all-purpose flour
1/2 medium onion, chopped finely
2 cloves garlic, minced
a dash of ground black pepper
1 1/2 teaspoons salt
1 teaspoon sugar

2 cups cooking oil (for frying)
1 block tofu, sliced into 1/2 inch thick strips (to be fried)

note: I added tofu to add volume to the dish. You can omit the tofu or you can omit the pork nuggets. Either way, both are perfect for the sauce.


How to:

1. Mix all the ingredients (except tofu and oil) very well. Form rectangular bite-size pieces of the mixture.

2. Heat 2 cups of cooking oil in a pan and fry the nuggets until golden brown. Also, fry the tofu.

3. Place the cooked nuggets and tofu on a paper towel or aluminum strainer and set aside.

Let's make the sauce!

You will need:

2 tablespoons olive oil or vegetable oil
1 clove garlic, minced
1/2 medium onion, chopped
4 pieces of fresh basil leaves, cut into long, thin strips (chiffonade)
4 pieces of small local red tomatoes, chopped
2 tablespoons chopped olives (optional)
1/4 cup red wine (optional)
1/2 cup chicken broth (or 1/2 buillon cube + 1/2 cup water)
1/4 cup tomato sauce or 3 tablespoons tomato paste
2 tablespoons sugar
salt and pepper to taste

How to:

1. Heat olive oil in a pan. Saute garlic, onions, and red tomatoes for 2 minutes. Add a little salt, pepper, and sugar and let caramelize for 2 more minutes.

2. (Optional) Add chopped olives and red wine. Let it boil and reduce to half till tomatoes are rich and thick.


3. Add tomato sauce (or paste), broth, and basil leaves and let sauce simmer for about 5 minutes or until the consistency is silky.

4. Season with salt, pepper, and more sugar as you please.

5. Add the pork nuggets and tofu into the sauce and mix well so the flavor of the sauce will seep into the dish.


This is the type of food you'd wanna come home to.

So full of aroma and bursting with flavor.

If you'd like, you can make the sauce in advance and keep it in the freezer and it's still great to be heated the next day!

Serve it over a hot bowl of rice or pasta. Yum!


Till the next eats!

Thursday, September 29, 2011

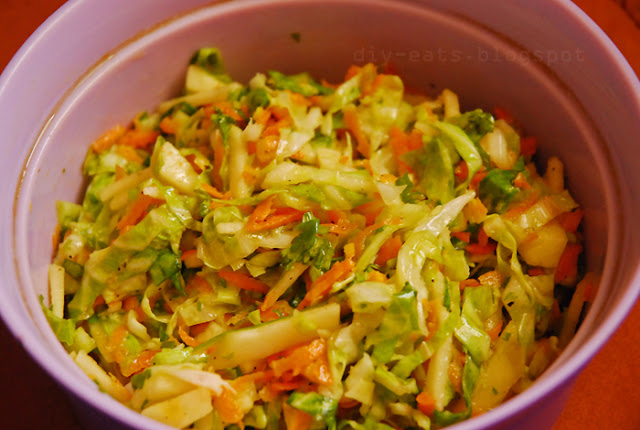
Sweet and Tangy Mayo-less Coleslaw


It's been a while.

And it makes me wonder (a lot) how time flies by even when you are not doing anything.

If this year is a person, it would have been bipolar.

By that, I mean it takes pure wisdom and understanding just to go through it, to survive it...

and still be whole in the end.

And just like last year, I wish the last quarter of this year will be a gazillion times better than the rest of it.

This heavy theme deserves a light recipe, wouldn't you agree?

This delicious mayo-less side salad is both sweet and sour. Classic life metaphor.

To Willow and all other vegans out there.


Sweet and Tangy Mayo-less Coleslaw
(derived from Cook's Illustrated June 2011)

You will need:

3 tablespoons cider vinegar
2 tablespoons olive oil or vegetable oil
1/4 teaspoon celery seed (optional)
1/4 teaspoon ground black pepper
1/2 large green cabbage (1 pound), cored shredded fine (loosely 6 cups)
1/4 cup sugar +extra for seasoning
table salt
1 large carrot, peeled and grated
1 large Granny Smitth or Fuji apple, cut into matchsticks
2 tablespoons chopped parsley or wansoy leaves
1/2 teaspoon Dijon mustard or 1 teaspoon Honey mustard (Clara OIe is a good inexpensive brand)


How to:

1. Combine vinegar, oil, celery seed (if you have), and pepper in medium glass or metal bowl. Place bowl in freezer/chiller until well chilled, about 15-20 minutes.

2. Toss cabbage with sugar and 1 teaspoon salt in a bowl and cover. Steam or microwave for 1 minute. Stir briefly, re-cover, and continue to steam/microwave until cabbage is partially wilted and has reduced in volume, about 1 more minute.

3. Transfer cabbage to salad spinner to remove excess water or you may use a strainer and push cabbage with a spatula to drain its liquid.

4. Remove vinegar mixture from the fridge. Add cabbage, carrots, parsley, apples, and dijon or honey mustard. Toss to combine.

5. If desired, adjust flavor with sugar, salt, or vinegar.

6. Refrigerate until well chilled. Toss again before serving.


Enjoy with light toast or fried tofu. Of course, it goes well with meat and seafood, too!

Things will be better.


Till the next eats!

Sweet and Tangy Mayo-less Coleslaw


It's been a while.

And it makes me wonder (a lot) how time flies by even when you are not doing anything.

If this year is a person, it would have been bipolar.

By that, I mean it takes pure wisdom and understanding just to go through it, to survive it...

and still be whole in the end.

And just like last year, I wish the last quarter of this year will be a gazillion times better than the rest of it.

This heavy theme deserves a light recipe, wouldn't you agree?

This delicious mayo-less side salad is both sweet and sour. Classic life metaphor.

To Willow and all other vegans out there.


Sweet and Tangy Apple Coleslaw
(derived from Cook's Illustrated June 2011)

You will need:

3 tablespoons cider vinegar
2 tablespoons olive oil or vegetable oil
1/4 teaspoon celery seed (optional)
1/4 teaspoon ground black pepper
1/2 large green cabbage (1 pound), cored shredded fine (loosely 6 cups)
1/4 cup sugar +extra for seasoning
table salt
1 large carrot, peeled and grated
1 large Granny Smitth or Fuji apple, cut into matchsticks
2 tablespoons chopped parsley or wansoy leaves
1/2 teaspoon Dijon mustard or 1 teaspoon Honey mustard (Clara OIe is a good inexpensive brand)


How to:

1. Combine vinegar, oil, celery seed (if you have), and pepper in medium glass or metal bowl. Place bowl in freezer/chiller until well chilled, about 15-20 minutes.

2. Toss cabbage with sugar and 1 teaspoon salt in a bowl and cover. Steam or microwave for 1 minute. Stir briefly, re-cover, and continue to steam/microwave until cabbage is partially wilted and has reduced in volume, about 1 more minute.

3. Transfer cabbage to salad spinner to remove excess water or you may use a strainer and push cabbage with a spatula to drain its liquid.

4. Remove vinegar mixture from the fridge. Add cabbage, carrots, parsley, apples, and dijon or honey mustard. Toss to combine.

5. If desired, adjust flavor with sugar, salt, or vinegar.

6. Refrigerate until well chilled. Toss again before serving.


Enjoy with light toast or fried tofu. Of course, it goes well with meat and seafood, too!

Things will be better.


Till the next eats!

Saturday, August 20, 2011

Tzatziki


I haven't been talking about my old non-paying job in a Greek restaurant last year. Not that there's nothing to talk about. In fact, there is a lot.

My family had a canteen twice in the past. Working in food production isn't new to me -- but the experience I've had in that specialty restaurant is a whole-world kind of different.

Whenever I think of it, studying in a culinary environment, lectures and laboratories -- I can say nothing beats the first-hand experience of hot busy kitchens, real customers with real expectations, bosses counting on you to deliver the best service you can give.


I confirm those three months of hustling and bustling stepped my game up a notch.

Here's one of my most favorite side/dip recipes I've learned (and tweaked a little) from that place.

It's very easy, very simple but so good it should be a staple in your home.


Tzatziki

You will need:

3-5 medium-sized Cucumbers
1 cup plain cold Yogurt
1/2 cup Sour Cream
1 teaspoon White Wine Vinegar
1 tablespoon Lemon or Calamansi Juice, freshly squeezed
1 tablespoon Olive Oil
1/2 teaspoon Garlic, minced
1/2 teaspoon minced fresh dill or mint
Salt and Pepper to taste
Bowls, clean pieces of cheesecloth or paper towels, strainers, a grater, a knife, a spoon

- - -


1. Ready a piece of cheesecloth (katsa) or paper towel over a strainer and place the strainer over a bowl.
2. Pour cold yogurt on the strainer and set aside.
2. Wash and peel cucumbers and cut in half. Take out the seeds with the use of a spoon.
3. Grate the cucumbers and squeeze out its juices. Season it with salt and place it on a cloth-lined or paper towel-lined strainer.


4. Set the bowls of yogurt and cucumbers in the refrigerator for an hour.
5. After chilling, transfer the yogurt to a mixing bowl.
6. Squeeze the cucumber some more to take as much juice from it as you can and mix it to the yogurt.
7. Add the sour cream, vinegar, lemon or calamansi juice, olive oil, garlic, and dill or mint.
8. Season with salt and pepper.

Tzatziki is best served chilled.

I highly recommend it as an alternative for slaws or pickles.

It's perfect with steaks, grilled meats, burgers, pita bread, etc.


Till the next eats!


Thursday, August 4, 2011

Corn Sotanghon Soup and Cocovado Smoothie


I guess I got out of July alive.

I went to a wedding, a christening, two family reunions, two shows, the movies, a 10-day wake and a burial (my grandma died), a competition (in which I won gold for Menu Writing and Design - yay!), and a couple birthday parties.

I want to say I'm glad to be here and typing away in my laptop despite my desktop PC crashing - along with all installed software.

Exhaustion should be the least of my worries.

I'm not a big complainer but life is a bitch sometimes.

And some days, that bitch is your best friend.

Do I still have the right to continue last month's theme? I do have the last couple of breakfast recipes on my lap.

To keep up with the two-week absence, I'm putting up two recipes in one post today.

Also, I'm doing this to prove to my self and every one that I am serious about the business of posting recipes.

Maybe not so much "on time" but you know. Okay. It's because I love you all.

Kind of looks like a gumbo!

Why corn? Why vermicelli? Why soup?

I know, I know. We can all buy something like this instant. Just pour hot water and you're good.

We got fresh corn produce from the province last week and I just had to do something with it.

Also, my lovely friend Malot asked for a soup recipe a few days back. It's been raining hard lately, such perfect time to gorge in hot soup!


As for the smoothie recipe, it's an ode to my younger sister who is prone to overuse the blender.

Elle is so good at making smoothies, I had to concoct one at some point so I made my very own breakfast smoothie recipe!

It's all so easy.

Corn Sotanghon Soup

You will need:

1/2 cup Corn Kernels (boiled if from the cob or you can use the canned variety)
1/2 cup Vermicelli Noodles (drenched in water, drained, and cut)
1/2 cup Carrots, small dice
1 liter Chicken Stock (pre-made broth or with bouillon cubes)
1 piece Chinese Sausage, sliced
1 cup Chinese Lettuce, cut into thin strips
1 medium Onion, small dice
1 clove Garlic, minced
1 small Ginger, pounded
1 tablespoon Cooking Oil
1/4 cup Chicharon (Crunchy Pork Rinds), coarsely ground (this is optional)
2 tablespoons Chives or Spring Onions, chopped
Salt and Pepper to taste

- - -


1. Saute garlic, onions, carrots, ginger, and sausage in a pot for 5 minutes. Add the corn kernels.
2. Pour in chicken stock and let it boil for 8-10 minutes or until corn is well cooked.
3. Season the soup with salt and pepper.
4. Add the vermicelli noodles and Chinese lettuce.
5. Serve hot and top with chopped spring onions and Chicharon bits (optional).

YUM!

- - -

Cocovado Smoothie


You will need:

1 cup fresh Coconut, shredded and about a cup of its juice (best if it's frozen)
1 cup fresh Milk, cold
4 tablespoons dark Muscovado Sugar dissolved in 1/4 cup water

- - -


1. Mix everything in a blender.


You're welcome!


Till the next eats,